Experiential Design // Task 3: Project MVP Prototype
15/6/2025 - 6/7/2025 / Week 8 - Week 11
Angel Tan Xin Kei / 0356117
Experiential Design / Bachelor of Design (Hons) in Creative Media
- Lecture
- Instruction
- Task 3
- Feedback
- Reflection
Mr. Razif taught us how to build and run a Unity project on a mobile device. For Mac users, we used Wecode to deploy the app onto our phones. This session helped us understand the steps needed to test and develop Unity projects directly on physical devices, which is essential for mobile app development.
|
We learned how to interact with the app on our phones by tapping the screen. Mr. Razif guided us through creating a simple interaction where cubes appear at any point we tap on the screen. We also added functionality to turn background music on and off, providing insight into managing UI buttons and audio in Unity.
This week focused on 3D building. We practiced building basic 3D models and learned how to scale them up and down dynamically within the Unity button environment. This session strengthened our understanding of object manipulation and spatial control in 3D scenes.
To begin using augmented reality (AR) in Unity, I needed to integrate Vuforia Engine into my project.
a) Download and Install Vuforia Engine
I first visited the Vuforia Developer Portal and created an account.
After logging in, I went to the Downloads section and downloaded the Vuforia Engine SDK for Unity.
I then imported the Vuforia Engine package into Unity by opening Unity and going to Assets → Import Package → Custom Package. I selected the downloaded Vuforia package and clicked Import.

|
| Vuforia Package imported into Unity |
b) Get the License Key
To use Vuforia, I had to create a License Key to connect my Unity project with Vuforia’s cloud services.
I went to the Vuforia Developer Portal, under the License Manager, and clicked on Get Development Key.
I copied the License Key provided by Vuforia.

|
| License Key for focusspace |
c) Enable Vuforia in Unity
In Unity, I went to Edit → Project Settings → Player.
In the Inspector window, under XR Settings, I checked the Vuforia Augmented Reality box to enable Vuforia for the project.
Then, I pasted the License Key into the App License Key field in the Vuforia Configuration settings.

|
| Open Vuforia Engine Configuration |

|
| Paste License Key in Vuforia Configuration Engine |
I went to GameObject → Vuforia Engine → AR Camera in Unity to add the AR Camera to my scene.
The AR Camera is used to view the real world through the phone's camera and overlay the AR content.

|
| Create AR Camera in Hierachy |
b) Adjust Camera Position
I adjusted the camera’s Transform values to make sure the AR Camera was positioned correctly to capture the real-world scene.
3. Creating and Uploading Image Target to Vuforia
a) Create an Image Target
To trigger AR content, I needed to use an Image Target—a specific image that Vuforia recognizes. Here’s how I set it up:
In Unity:
I went to GameObject → Vuforia Engine → Image Target to create the image target.
This automatically created an Image Target in the scene, and I could position it where I wanted the AR content to appear.

|
| Creating Image Target in Unity |
b) Upload Image target to Vuforia Engine
Before uploading the image target to Unity, I needed to register it in the Vuforia database.
In Vuforia:
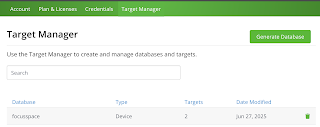
I logged into the Vuforia Developer Portal and navigated to the Target Manager.
I clicked on Create Database and named it focusspace.

|
| Target Manager Database in Vuforia Engine |
I uploaded an image target I wanted to use as a marker in the Target Manager.
Once uploaded, Vuforia automatically created a Target Database with the image.
I downloaded the database after it was processed and imported it back into Unity.

|
| Image Target uploaded in Database |
c) Import the Target Database into Unity
After downloading the target database from Vuforia, I went to Unity and clicked on Assets → Import Package → Custom Package.
I imported the database, and Vuforia automatically created a Vuforia Database under Assets.
I then linked the image target in my Unity scene to the image from the Target Database.

|
| Target Database in the Unity |
4. Adding 3D Models to the Image Target
Now that I had my image target set up, I added the 3D models (such as the heart model) that would appear when the camera detects the image.
a) Import the 3D Model
I downloaded a 3D heart model from Sketchfab and imported it into Unity by dragging and dropping the file into the Assets folder.

|
| Heart Animations from SketchFab |

|
| Heart Animation Imported to Unity |
b) Position the 3D Model
I dragged the 3D heart model into the Hierarchy and positioned it on top of the Image Target.
I made sure that when the camera sees the image target, the heart model appears on top of it in the AR scene.

|
| 3D Model under Image Target in Hierarchy |
5. Rotation Script for the 3D Model Heart
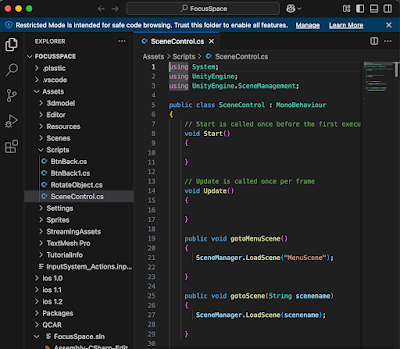
To allow users to rotate the heart model, I wrote a C# script that enables the user to drag the mouse to rotate the 3D model.
a) Creating the Script
I created a C# script named RotateObject and added code to allow for mouse drag-based rotation:

|
| RotateObject Script |
b) Attach the Script to the 3D Model
I attached the RotateObject script to the heart model so that it could be rotated by the user when interacting with the AR content.

|
| RotateObject Script attached to the 3D Model |

|
| Script Machine |

|
| Notes Panel Show |

|
|
Quiz Panel Show |
- Onboarding Scene
- MenuScene
- Image Target Scanning
- Easy Notes Unfold
- 3D Models of Lung Topic
- Timer Start Counting Down
- Drag and Drop Quiz and Cue Cards
Throughout this prototype stage, the process was undeniably challenging due to the steep learning curve involved. Before I could begin development, I had to first determine how to enable the AR camera to recognize our image target. This led me to discover how my image could present and UI structured as a potential solution.
With the engine model ready, I applied concepts taught in class, such as scene management and UI element animations, to enhance the user experience. However, a key challenge emerged during the AR implementation. I initially didn't know how to highlight individual engine parts within a single unified model.
To solve this, I realized that I needed to separately model each engine component in order to obtain their individual meshes. I added the appropriate UI overlays to display the names of the engine parts, completing the AR interaction.
In summary, this prototype journey involved technical exploration, problem-solving, and practical application of classroom knowledge culminating in a working AR experience that identifies and highlights various engine components.


Comments
Post a Comment