Experiential Design // Task 1: Trending Experience

- Instruction
- Lecture
- Task 1: TRENDING EXPERIENCE
- Feedback
- Reflection
- Explore the current, popular trend in the market to give them better understanding of the technologies and the knowledge in creating content for those technologies.
- Conduct research and experiment to find out features and limitation which will later allows them to make decision on which technologies they should proceed with in their final project.
- To complete all exercises to demonstrate understanding the development platform fundamentals.
- Submit the link to your blog post, make sure all the exercises are updated on your blog.
In the first week, Mr. Razif introduced the subject outline and outlined his expectations for the course. We were shown examples of previous student projects, which helped us understand the concept of augmented reality (AR) and gain some ideas for the following tasks. He also explained the various types of AR experiences and the technologies used to develop them, guiding us through the basics of designing an AR concept. Through this session, we developed a solid understanding of the distinctions between AR, VR, and MR, learned to identify AR and MR applications, created our own AR experience, and even built a simple AR app during the lecture.
- Augmented Reality (AR): Enhances the real, physical world by overlaying digital content.
- Mixed Reality (MR): Combines the physical and digital worlds, allowing interaction between real and virtual elements.
- Virtual Reality (VR): A fully immersive digital environment, separate from the physical world.
- Extended Reality (XR): A broad term encompassing AR, MR, and VR technologies.

|
| Fig.1 Differences between AR,MR, and VR (Week1) |
My group chose a theme park as our scenario. We decided to use Figma as our design tool and found a well-structured template that helped us effectively organize and present our ideas.
In our journey map, we visualized the user experience within the Tokyo Disneyland Theme Park as most of us have been there before and experienced through the following stages:
- Parking Space
- Ticket Counter
- Main Entrance Photo Spot
- Park Navigation
- Attraction Queue
- Attractions
- Parades & Shows
- Dining
- Merchandise
- Night Finale
- Exits & Memories
|
|
| Fig 3.3 Hamster accompanying me in Lesson |

|
| Fig 3.4 Group Exercises |
Scenario Overview:
Our group has chosen a gym setting as the basis for our AR experience. Many gym-goers—especially beginners—struggle with understanding how to correctly use workout machines. This often leads to improper form, inefficient workouts, or even injury.
AR Experience Implementation:
We designed an augmented reality (AR) solution that allows users to scan gym equipment with their phones. Once scanned, the AR system displays a virtual trainer or step-by-step instructions demonstrating the correct usage of the machine. This includes animated guidance on posture, movement, and targeted muscle groups.
Extended Visualization:
The AR overlay features interactive 3D models animated in real time, showing how each machine should be used. It also provides tips on recommended sets, reps, and the muscle areas each exercise targets. Based on the equipment present in the gym, the system can suggest personalized workout routines.
User Experience and Emotion:
The primary goal is to make users feel confident and empowered during their workouts. With clear, instant guidance, users gain practical knowledge that helps them exercise safely and effectively. The AR experience enhances their sense of security and motivation, reducing anxiety and the risk of injury.
Presentation Slides:
Self-Reflection:
In this project, our team developed the Gym AR Trainer concept aimed at helping beginners like navigate rookie at gym with greater ease and confidence. This experience deepened my understanding of how augmented reality can deliver real-time assistance and visual feedback, especially in environments where users might feel unsure or self-conscious. Designing the AR system highlighted the value of tailored support and clear, intuitive visuals to provide hands-free guidance, eliminating the need for users to seek help directly. Working on features such as the Rep & Set Tracker and the Virtual Personal Trainer helped me explore how AR can reduce workout anxiety, improve precision, and boost user confidence. Overall, this project demonstrated how thoughtful experiential design can enhance everyday routines, making physical activity more accessible, interactive, and user-friendly through technology.
AR Design Workshop 1 - AR Experience Development (Unity & Vuforia)
This week, we installed Unity on our laptops as the main platform for developing our AR applications. Before class, we were required to complete the MyTimes tutorial, which introduces the fundamental steps for creating a basic AR experience.
The tutorial involved scanning an image marker that would trigger two AR elements: a 3D cube and a video plane. For my project, I used a selfie as the image marker and linked it to an online video. By carefully following each step of the tutorial, I was able to ensure that the AR elements appeared correctly during testing and functioned as expected.
Using the Vuforia Engine:
-
Registered a Vuforia account
-
Selected version 10.14 and downloaded the Vuforia Engine
-
Added Vuforia to my Unity project (or upgraded to the latest version if already installed)
-
After the download was complete, I double-clicked the file and imported it into Unity
This hands-on exercise helped solidify my understanding of how to integrate Vuforia with Unity and build a simple yet functional AR experience from scratch.


Fig 3.5 Download Vuforia Engine (Week 3)
In this session, we explored how to build a basic augmented reality (AR) experience using Unity and the Vuforia Engine. The process involved several essential steps:
1.Initializing the Unity Project:
We started by creating a new project in Unity, selecting the Universal 3D template, which is compatible with AR development and supports the Universal Render Pipeline (URP).
2. Integrating Vuforia SDK:
To enable AR features, we imported the Vuforia SDK into Unity. This toolkit facilitates image recognition and allows 3D objects to be displayed when specific images are detected.
3. Scene Construction:
We then set up the scene with key components:
- ARCamera: Responsible for recognizing the image target and aligning virtual content with it.
- Image Target: A designated visual marker that triggers the AR experience.
- 3D Object: A simple cube was added as the 3D content to appear when the image target is identified.
4. Creating the Vuforia Target Database:
Using the Vuforia Developer Portal, we uploaded our chosen image target, named hamster, which received a 2stars rating for tracking accuracy. We then generated and downloaded a target database to import into our Unity project.

|
|
|
5. Configuring the AR Elements:
In Unity, we positioned the cube over the image target so that it would be visible when the target was detected. We tested this interaction using Unity’s simulator to preview how the AR content would appear.
6. Building and Testing on Device:
Finally, we deployed the AR scene to a mobile device to verify that the cube correctly appeared and aligned with the image target in a real-world setting.

|
|
Fig 3.7 Final Outcome: cube appears on Screen (Week 3)
|
Self-Reflection : AR Development Experience
This hands-on AR development session was an insightful introduction to working with Unity and Vuforia. It helped me understand the process of triggering and displaying AR content through image recognition. Initially, coordinating the setup between Unity and the Vuforia platform seemed complicated, especially in terms of database management and aligning configurations. However, once everything was correctly connected, witnessing the AR object come to life on a mobile device was incredibly rewarding. Collaborating with classmates and referencing the tutorial video helped resolve confusion and clarified each step of the process. I also realized how critical precise placement of assets is, as small misalignments can negatively affect the AR experience. Overall, this activity significantly increased my confidence in creating AR applications and provided a solid foundation for developing more complex AR projects in the future.
In this session, we advanced our AR development by focusing on screen navigation, building on the previous tutorial. The main goal was to incorporate interactive buttons that let users switch between screens and control the display of AR content. We continued to use the Spiderwoman image target to maintain consistency throughout the project.
1. Scene Initialization:
We began by creating a fresh scene in Unity, opting for the Basic (Built-in) template to ensure a clean and straightforward user interface.
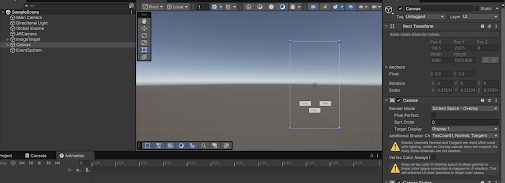
2.UI and Canvas Configuration:
A Canvas was added to the scene to contain all user interface elements. Within the Canvas, we inserted a Panel to serve as the background layer, we renamed the first button to BTN_HIDE and changed its label to “HIDE”, and did the same for the second button, renaming it to BTN_SHOW with the label “SHOW”. This was done by expanding each button object and editing the child Text (TMP) component from the Inspector panel.
3. Button Interactivity:
We used Unity’s UI Button component to define the functionality of each button. Pressing the Hide button concealed the AR object, while the Show button revealed it again. This allowed users to interactively control what appears on the screen, simulating a simple navigation system.
4. Scripting the Behavior:
We attached a script using the “Set Active” method to control the cube’s visibility. Each button was connected to a specific function within the script, allowing users to toggle the panel and cube based on their inputs.We assigned the GameObject containing the AR Cube to the button’s OnClick() field, and then used Unity's built-in function: GameObject.SetActive(bool). For the "HIDE" button, we set SetActive(false) to make the AR Cube disappear. For the "SHOW" button, we set SetActive(true) to make the AR Cube reappear.
5.Testing and Troubleshooting:
We tested the scene to confirm that the buttons worked correctly and that the AR content continued to respond appropriately to the hamster image target.

|
|
Fig 4.2 Final Outcome: Square was hidden (Week 4)
|

|
|
|
This session offered valuable insight into how user interface elements can enhance interactivity within AR applications. Setting up and linking the buttons to control AR visibility gave me practical experience in integrating UI with AR features in Unity. Initially, aligning the buttons with the C# script posed some challenges, particularly in ensuring responsive behavior. Through testing, I also learned how small adjustments in Canvas properties.
1.Maintaining the Scene:
We used the same AR setup with the Spiderwoman image target and retained the existing cube as the animated object.
2.Creating an Animation Clip:
Using Unity’s Animation tab, we created a new clip named CubeAnimation, incorporating basic movements such as rotation, scaling, and position changes to give the cube more visual appeal. Keyframes were inserted to define specific animation sequences.
3.Animator Controller Setup:
An Animator Controller was created and assigned to the cube. This allowed us to manage the animation’s behavior and transitions within Unity’s Animator window.
- When the "PLAY" button is clicked, we enabled the Animator component to be ticked and the cube’s animation to play.
- When the "STOP" button is clicked, we disabled the Animator component to be unticked, which stopped the animation playback.
- When the "HIDE" button is clicked, we SetActive(true) to make the AR Cube reappear.
4.Triggering the Animation:
The animation was configured to play when the AR image target was detected. Additional UI buttons were added to allow users to play and stop the animation manually, further integrating user input.
5.Testing and Debugging:
We tested the functionality to ensure that the animation played smoothly upon detection of the image target and responded accurately to user commands.could influence usability, highlighting the importance of accurate alignment and scaling. Overall, this exercise deepened my understanding of screen navigation in AR, showing how even simple interactions can improve user engagement and control.
|
| Fig 4.4 Conecting Fuctions to Buttons |
Self-Reflection – Cube Animation
Incorporating animation into our AR scene significantly enhanced the user experience by adding motion and responsiveness to the content. This session allowed me to explore how animation can make digital objects feel more dynamic and engaging. Fine-tuning the animation flow and achieving smooth transitions proved to be a learning curve, as even slight timing differences affected the visual output. Adding user-triggered controls through buttons demonstrated how users can directly influence AR elements, leading to a more interactive experience. Overall, this part of the project reinforced the role of animation in capturing attention and conveying action, forming a crucial step toward creating richer, more immersive AR environments.
During the first week, me and Yuk Guan worked together in a pair for this task. We both did some brainstorming and came up with a total of 6 ideas to suggest to our lecturer. For every idea, we wrote down the title, the problem it solves, the solution we suggest, the target audience, the steps or process, the advantages (pros), the disadvantages (cons), and the feedback we gave each other. Below are our ideas documented in a Google Docs.
Google Docs Link: https://docs.google.com/document/d/1Lg4c1uSZ8CLwflM3ud4_vZObHbC-0IATCjV4znpDvl4/edit?tab=t.0#heading=h.tbdxroct9z1y
Mr Razif also mentioned that we can try out his GPT that will give feedbacks based on our proposed ideas, so here is the feedback from TDS XD Assistant.
Week 2 Consultation
1. Culture Heritage
This idea is about scanning pictures in books or artwork. After scanning, an animation will pop up to explain the history and meaning behind it—like in a museum. But the lecturer said it’s too common and similar to other ideas that already exist.
2. Pet Care Trainee
This app helps people who want to own a pet. It teaches how to feed, clean, and take care of animals through a fun game. But the lecturer said it feels like a normal quest game and is not very special or new.
3. AR Study Buddy
The idea is to have a virtual study friend that works like ChatGPT to answer questions and help you study. But the problem is you have to keep holding your phone while studying, which is uncomfortable and not very practical.
4. AR Cooking Guide
This app scans fruits or vegetables and shows step-by-step cooking instructions. But food changes every day, so it’s hard for the camera to scan it correctly. The lecturer said it might be better to scan kitchen tools like an oven instead.
5. AR Planting Tips
This idea helps people take care of plants. You scan the plant, and the app tells you what’s wrong with it. But the problem is the app may not always recognize the plant clearly because of light or camera angle, so the results might be wrong.
6. AR Furniture Placement
Like the IKEA app, this idea lets users place virtual furniture in their room to see how it looks. But users might find it hard to measure the furniture size correctly, so the placement might look confusing or not match real size.
Experience:
Collaborating with my teammate to conceptualize the AR trend experiences was both inspiring and deeply rewarding. I aimed to create an experience that fused imagination, emotional resonance, and interactive technology. Influenced by traditional pet simulation games, Culture Heritage Games and AR Studdy experiences, I imagined a world where users could form real-time connections with magical pets in their everyday environments. The development process enabled me to weave together narrative elements, gamified caregiving, and augmented reality, resulting in an experience that felt both creatively rich and emotionally engaging.
Observation:
While exploring the landscape of augmented reality experiences, I noticed that many AR applications prioritize visual novelty or location-based interaction but often lack emotional depth or sustained user engagement. Despite advancements in AR technology, a significant number of apps still offer limited interactivity or storytelling, leaving users with short-lived experiences. I also observed that users increasingly seek more meaningful, emotionally resonant interactions in digital environments—experiences that go beyond entertainment to provide a sense of connection or companionship. This highlighted an opportunity to create an AR experience that balances immersive technology with emotional engagement and long-term value.
Findings:
The ideation process revealed that combining magical fantasy with real-world interaction significantly enhances user engagement and long-term interest. I also found that integrating physical elements such as like scanning a tangible potion book strengthens the link between the digital and physical worlds, making the experience more immersive and memorable. In the end, the concept evolved into something both enchanting and meaningful: a digital companion that brings joy, emotional connection, and care through technology.


Comments
Post a Comment